Time To Get Sowing With Wally
Posted on July 09 2025

We’ve made it past the shortest day, and if you’re a keen gardener (or even just curious), that means one thing - it’s time to sow some seeds!
I love receiving Wally Richards emails that are packed full of valuable gardening information, last week he shared everything you need to know about getting started with seed raising in winter.
Whether you have a big back garden, a sunny balcony, or just a windowsill to work with you can raise seeds and plant seedlings, Wally’s practical advice makes it easy and accessible for everyone.
To sign up to this fantastic gardening resource email wallyjr@gardenews.co.nz
TO PURCHASE WALLY'S WONDERFUL GARDEN PRODUCTS GO HERE
I love the Magic Botanic Liquid
This is transcribed from Wally's via his email newsletter ...
We’ve passed the shortest day, and that means it’s officially seed-sowing season! Whether you’re keen to grow your own veggies, herbs, or flowers, getting started from seed is the most affordable and rewarding way to garden.
In this guide, Wally shares practical tips for germinating seeds successfully — from creating the ideal seed-raising mix to using heat pads, meat trays, and even upcycled polystyrene boxes. If you’ve ever wanted to grow strong, healthy seedlings at home (even on a balcony or in a small space), this is the perfect place to start.
Now we are past the shortest day it is time to get sowing seeds or planting seedlings.
Growing plants, flowers or vegetables from seed is the cheapest and best way to obtain good plants.
This can be done by germinating seeds in seedling trays or punnets or by germinating them where they are going to grow to maturity. (The later is the best way to obtain the best plants)
If you are going to germinate seeds in a seedling tray/punnet then for best strikes you will need under heat.
If you do not have a heat pad then into 'Google' put 'heat pad for seed germination' and you will have several options,
aliexpress has the best prices and 3 different sizes on offer from a small pad suitable for a punnet at $1.66 plus shipping to a large pad 25 x50 cm for $22.27 plus shipping. If buying make sure the plug is AU otherwise you would need an adaptor.
The heat pad should be sitting on a polystyrene base so that all the heat is directed upwards.
If using punnets as the seedling trays then you can also place under them, meat trays you get your meat in from the supermarket. That tray can be used to fill with water when the punnet is sitting in it for moisture to be taken up and keep the seedling mix moist.
Now what mix should you use in the seedling tray? These days I have found brand name seed raising mixes are rubbish as they dont use peat moss like in days gone by,
in fact you would be better off going to a hardware shop and getting a bag of builders sand and using that. Builders sand (Sharp Sand) comes from grinding rocks to make the sand so it is weed free which sand from natural sources
such as beach or rivers are likely to contain weed seeds.
But you can still obtain river/sea sand then bake it in the oven for a short time or beep it in microwave on high to kill any weed seeds. (likely it will smell when you do it)
My favorite, Value Compost is what I use by placing a layer of that to half fill the seed tray and then with a kitchen sieve, sieve some of the same over that to make a fine fine bed to sprinkle seeds on.
Seeds you sow at this time of the season are the hardy plants such as brassicas and silverbeet.
Those that are fortunate to have glasshouses or similar can start off tomato, cucumbers, egg plants and chili now other wise leave those for another month or so before germinating.
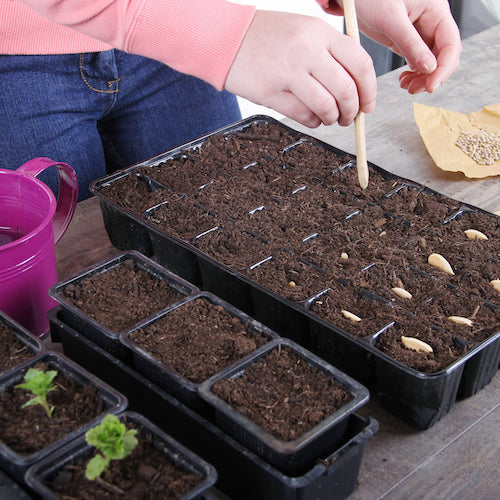
Place or sprinkle the seeds over the seedling bed you have sieved and then spray them with Magic Botanic Liquid (MBL) which breaks the dormancy quickly and they sprout, with the moisture and under heat.
Over the seeds either sprinkle sharp sand or sieve a little more of your compost.
Your heat pad and seedling tray should be placed some where that you will see them several times a day to keep and eye on them. (Like on a kitchen bench)
If the mix looks a bit dry spray it with MBL which should be made up in a trigger sprayer sitting next to your propagation place.
Now this is most important, as soon as there is some show of germination the tray must be placed where the baby plants get full light from above.
If you dont then the seedlings will stretch to what ever light is available and be ruined and you wasted the seed and your time.
Now if you have a bench in your glasshouse they should be placed there immediately once there is a show. Then they will not stretch and they will be hugging the mix they have germinated in with their first leaves just above the mix.
From this point they will grow upwards as sturdy strong seedlings.
If you don't have a glasshouse then obtain a polystyrene box (about 15cm deep) placed in a full sun situation outside with a sheet of clean glass over the tray to protect from birds and vermin.
Its a good practice to place a small length of wood 15cm long and about a cm thick at two opersite corners of the polystyrene tray to sit the glass on which then allows condensation to escape.
Alternative is a old drawer or plastic tray that has a depth of 15cm there about.
The polystyrene box is best as its white and increases light by reflection. Alternative place a bit of Panda film in a suitable tray with white side upwards.
Check the seedlings every day and if they appear to be stretching at all move to a better place.
Also mist them with your made up MBL to keep the mix moist, the meat tray with water in can also help if they tend to dry out too quickly.
When they have grown up to touch the glass cover, then remove the glass and they can start to harden off. A spray over the foliage of Vaporgard about three days before you plant them out is ideal to protect them from
the stress of transplanting and also harden then off completely against cold and wind factors.
In the planting hole place a pinch of the following, BioPhos, Ocean Solids, Wallys Calcium & health and a couple of sheep manure pellets. Spray the young plants once a week with MBL.
Now if you prefer to plant the seeds directly where they are going to grow and in particular seeds of carrots, parsnips, beans and peas then you make a trench in the open ground about 12cm wide and 12cm deep.
After which you then mow the lawn catching the clippings which you will pack down into the trench till it is about two thirds full, compacted.
Now over the clipping sprinkle BioPhos, Ocean Solids, Wallys Calcium & health and sheep manure pellets. (Or any chicken mature or animal manures available)
Over this you either sieve soil that was removed from the trench or even better my preferred brand of compost. Place your seeds at correct spacing along the trench and spray them with MBL mix.
Then sieve more to cover them. The trench might not be full to ground level which is ok as it will help to make watering easier later on.
I like to cover with sharp sand as it is easy to see when dry and then lightly water.Clear plastic film could be laid over the trench to deter birds, vermin and cats from disturbing the germinating bed/trench.
That would be held in place by lengths of wood, old bricks or stones.
If you dont have open ground to grow in the use Grow Bags or containers about bucket size which you fill with Value Compost and the layer of the products that I have mentioned.
Now for the grow bags; which I have found square ones on Pestrol' s web site at https://www.pestrol.co.nz sizes 25cmx25cm which is ideal for a bush tomato plant such as Russian red or a couple of cucumber plants, a capsicum or chilli.
Also ideal for a crop of spring onions, carrots, dwarf beans.
Then larger sizes 45cm x 45cm and a big 65cmx 65cm which is really a small garden that you can grow a few good vegetables in. Prices are only $6.90, $8.90 and $10.90 respectfully, plus shipping,
On the same site look at Garden Grow Beds square taking 60 litres of mix or bigger 120 litres which are ideal for small gardens in sunny place and not taking much room as well. ($27.90 $38.90 plus shipping, great value)
Like any raised or container gardens you don't have to throw away the growing medium and put fresh in when a crop is harvested.
All you do is add the products talked about above and the a fresh layer of mix over them and plant again.
All the roots and food values left over from the harvest will go towards feeding the new crop.
For instance say in a 120cm bed as above you plant some cabbages, cauliflower and broccoli.
When they are mature you cut the heads off then and leave the stalks in the grown where they will continue to grow and quickly produce a number of small heads.
The outer leaves you are not going to use, you trim off the head and lay those leaves on the top of the mix to be recycled back into the medium.
After you have harvested the small heads on the stalk you cut that off below soil level to allow the roots to rot and provide food for next crop.
Even on a small apartment balcony on a sturdy table you can grow some stuff, likewise in a retirement place where you have a bit of space outside on concrete or some where; you can do it. Its fun and great for your health.
Wally
Phone 0800 466464
Garden Pages and News at www.gardenews.co.nz
Order gardening products at www.0800466464.co.nz